Adding Java Servlet API Capability to Netscape Servers
Introducing Live Software's JRun Servlet Engine
By Paul Colton
Send comments and questions about this article to View Source.
Click here for printer-friendly version
Like other web server APIs, such as CGI and Netscape's NSAPI, the
Java Servlet API from JavaSoft offers a way to extend the
functionality of web servers. Introduced as a means of standardizing
the use of Java with web servers, the Java Servlet API is indeed
becoming a de facto standard for web server programming. It has
replaced the HttpApplet API (for more on this, see
Using
Server-Side Applets on Netscape
Web Servers) as well as edging out the new Web Application
Interface (WAI) that until recently was expected to prevail.
At first, the Java Web Server was the only server to fully support
the Servlet API. But with its release of Enterprise Server 3.5.1,
Netscape introduced basic support for the Servlet API through the use
of Sun's reference implementation, the Java Servlet Development Kit
(JSDK). The only problem is, the JSDK is already outdated: it
supports version 1.0 of the Servlet API but not version 2.0 with its
many new features, including user session tracking.
Fortunately, there's a product freely available from Live Software
that adds full Servlet API capability to all Netscape servers,
including FastTrack and Enterprise Servers 2.x and 3.x, on all
platforms. Called the JRun Servlet Engine, or simply JRun, this
product is a web server extension that makes Netscape servers totally
compatible with the Servlet API and enables them to run Java
servlets. JRun combines a Netscape plug-in that interfaces directly
and immediately with your web server with a collection of Java
classes that provides the interface layer between your server and the
servlets that you run.
In this article I'll briefly discuss servlets and their benefits
before telling you how to install and configure the JRun Servlet
Engine. Then I'll take you through a tutorial designed to get you up
and writing your own servlets in no time. I'm
assuming you already know the basics of Java.
WHAT'S A SERVLET, ANYWAY?
What exactly is a servlet? It's a server-side component
written in Java that basically replaces CGI scripts. Servlets provide
the usual HTTP services of retrieving files, creating directory
listings, and performing basic CGI functions, yet they involve only
about 900 lines of code, far smaller than a CGI script. Because
servlets are written in Java, they're more flexible and stable than
CGI scripts and give developers an interface that can be used on any
platform without additional porting. As a result, servlets enable
users to dynamically extend the functionality of their web server on
the fly.
Servlets can be used to provide a limitless range of customized
services. For example, servlets can be used to look up records in a
database in order to generate a web page on the fly. System
administrators can upload administration servlets on demand, such as
log servlets that monitor visitor activity at a web site or proxy
servlets that perform traffic characterization and filtering. And
servlets can also be used for load balancing in multitier
applications. In a three-tier system, for example, the first tier
could be a Java-enabled browser on a thin client, the second tier
could consist of servlets that encapsulate specific business rules
and logic, and the third tier could be comprised of legacy database
information.
WHY USE SERVLETS?
Servlets offer many benefits to the developer, including ease of
development, automatic garbage collection, fast throughput and
response, interservlet communications, and all of the features
inherent in Java. The HTTP services provided in the Servlet API are
very convenient, and the API model and methods appear logical and
clean, like most of the standard Java API.
Overall, Java is an easier and friendlier development environment
than any of the other languages traditionally used to develop CGI
scripts (C, C++, and the favorite, PERL). For instance, in a servlet,
you need only a few simple print statements to output information to
the web. Working in Java, you also have available the power of
Java's large API (including JDBC and LDAP).
Using servlets relieves you of the need to worry about the inner
workings of the server. The Servlet API comes standard with a set of
classes specifically oriented toward HTTP processing. Form data,
server headers, cookies, and such are all handled for you by these
classes. Additionally, because servlets are written in Java, you can
move them from one platform to another for deployment and not worry
about the operating system, as long as it supports Java. This
advances Java's whole notion of "write once, run anywhere."
Servlets are modular, offering a true component model for building
server-side applications. You can assemble any number of different
servlets, perhaps from different vendors, and they'll work together
seamlessly, each performing a specific task. Servlets can talk to
each other, and they can also be chained together in a feature known
as servlet chaining.
Servlet chaining is the capability whereby one servlet's output is
"piped" into another servlet as its input. This can continue for
multiple servlets. For example, a spelling-checker servlet could be
chained after any other servlet to check spelling in the output sent
to the client. Or a servlet that produces text could be chained to
the spelling-checker servlet, then to a language-translation servlet.
Each servlet need not know about the capabilities of the others, yet
all can work seamlessly together. This is made possible by the use of
a consistent server-side API.
In the end, the biggest difference between CGI and servlets is
performance. A web server's CGI interface incurs heavy expense by
launching full-fledged programs to handle each user's request. By
contrast, when you use servlets, there's a single Java Virtual
Machine (JVM) running on the server and the servlet is loaded once
when it's called. It's not loaded again until the servlet changes,
and a modified servlet can be reloaded without restarting the server
or application. The servlet stays resident in memory and is very
fast. And static or persistent information can be shared across
multiple invocations of a servlet, allowing you to share information
between multiple users.
INSTALLING AND CONFIGURING THE JRUN SERVLET ENGINE
Before installing JRun, you must make sure you've turned on Java
support in your Netscape server. Do this as follows:
- Enter your Netscape administration server and select the
Programs menu.
- Select the Java option from the menu.
- Click Yes to activate the Java interpreter.
Figure 1 shows what your screen should look like when you've
performed the above steps.
Figure 1. Turning on Java support

The next step is to download JRun from the Live
Software web site. You can download either the
Unix version or the Windows version.
- The Unix version comes as a .tar.gz
file. Uncompress (using gzip -d filename.tar.gz) and
untar (using tar -xf filename.tar) the file, then follow
the instructions in the README file to start the
connection wizard.
- The Windows version comes as a .zip
file. Unzip the file (using WinZip or another unzipping
program) and run the setup.exe program. The setup.exe will run an
installation wizard that will copy the files onto your hard drive,
then launch the connection wizard.
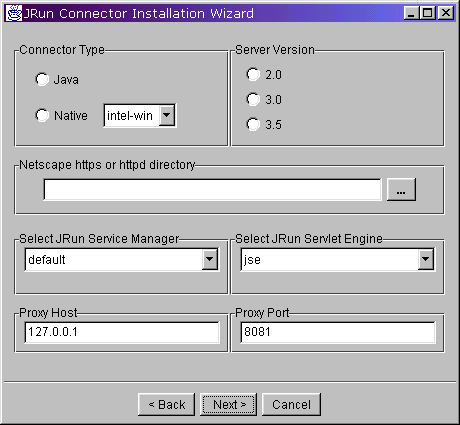
The JRun Connector Installation Wizard is
used to "link" JRun to your Netscape server. Figure 2 shows the
wizard's settings for installing the connector for Netscape servers.
Note that you can choose either Java-based or NSAPI-based (native)
connectors, as well as specifying the version of Netscape server
you're running. Once you proceed with the Connector Installation
Wizard, it will automatically adjust your Netscape obj.conf
file to properly run servlets. More information on the wizard
can be found in the JRun documentation, which is available for
downloading
or can be viewed online.
Figure 2. Connector Installation Wizard settings for
Netscape servers
Now that you can run servlets, the next section shows you how to
start writing your own servlet-based applications.
WRITING YOUR OWN SERVLETS: A TUTORIAL
The best way to explain the basics of any programming language and
API is with the help of the simplest program we can develop. In this
tutorial, we'll start with a "Hello World!" program. As I tell you
more about the Servlet API, I'll modify the program, ending up with a
large, yet easy-to-modify program that will cover the primary aspects
of the API. By the end of this tutorial, you'll have a basic
understanding of the Servlet API and all the tools necessary to
develop any servlet.
The Basic Program
We start our tutorial by taking a look at the program in Listing
1. The first lines import all the packages necessary to implement the
servlet interface. The lines of code that may not be familiar are
import javax.servlet.* and import javax.servlet.http.*.
These are just packages from the Servlet API.
The sample code included here is provided for your use on an "AS IS" basis, under
the Netscape License Agreement - Terms of Use.
Listing 1. A simple "Hello World!" program
import java.io.*;
import javax.servlet.*;
import javax.servlet.http.*;

public class HelloWorld extends HttpServlet
{
   public void service(HttpServletRequest servReq, HttpServletResponse servRes) throws IOException
   {
      ServletOutputStream out = servRes.getOutputStream();
      out.println("Hello World");
   }
}
Next, we see that the "Hello World!" program extends the
HttpServlet class and doesn't explicitly implement the servlet
interface we just mentioned. The reason is that the HttpServlet
class implements the servlet interface. It's a common practice
for the servlet developer to extend the GenericServlet
or HttpServlet class instead of implementing the
servlet interface. When to extend from GenericServlet
versus HttpServlet will become clear as we learn more
about the Servlet API.
The service() method implemented in the example will be
called repeatedly. The first parameter of the service()
method is an HttpServletRequest object that provides an
InputStream so that servlets can read client requests. The second
parameter of the service() method is an
HttpServletResponse object that provides an OutputStream so that
servlets can write a response back to the client.
The rest of the program is self-explanatory. At this point, all
you need to do is compile the Java code to get your servlet class
file. After successfully compiling the code, put the servlet class
file in the appropriate directory so the web server can have access
to it.
Our simple "Hello World!" servlet is the most basic program that
can be created using the Servlet API. From this program, we learned
that all servlets must implement the servlet interface and that it's
customary to do so by extending either the GenericServlet
or HttpServlet class, both of which implement the
interface.
The Servlet's Life Cycle
Now let's address what happens when a client invokes a servlet.
When this happens, the servlet goes through a three-stage life cycle:
initialization, service, and destruction.
- During the initialization stage, the servlet is initialized
via the init(ServletConfig) method, which gets called
only once. At this stage, it's a good idea to allocate all of the
resources the servlet will need throughout its life cycle.
- During the service stage, the servlet takes care of all
incoming requests via the service(), doGet(),
or doPost() methods. If you're not familiar with the HTTP
protocol, which method to implement will become clear as we
continue with the tutorial. In our example we use the
service() method, but we could have used the doGet()
or doPost() methods, which will be explained later
in this tutorial.
- During the destruction stage, the destroy() method
gets called either implicitly or explicitly. Inside the
destroy() method is where you would free all the allocated
resources that the servlet was using during its life cycle. As
soon as the destroy() method gets invoked, the class can
be garbage-collected.
Now that we know more about the servlet life cycle, let's rewrite
the "Hello World!" example program using the appropriate methods.
Listing 2 shows the same example as Listing 1, but with the
init(), service(), and destroy() methods in place. At
this point, these methods aren't doing anything, but as we'll see in
future examples, they can be very useful.
Listing 2. The "HelloWorld!" program with init(), service(), and
destroy() added
import java.io.*;
import javax.servlet.*;
import javax.servlet.http.*;
public class HelloWorld extends HttpServlet

{
   public void init(ServletConfig config) throws ServletException
   {
   // This method initializes the servlet and gets called only once.
   // Allocate all of the servlet resources here.
      super.init (config);
   }

   public void service(HttpServletRequest servReq, HttpServletResponseservRes) throws IOException
   {
      ServletOutputStream out = servRes.getOutputStream();
      out.println("Hello World");
   }

   public void destroy()
   {
   // Once this method is called, any instance of this class can be garbage-collected.
   // Here is where all servlet resources can be deallocated.
   }

}
Regular Parameters
The example program we've been using up to this point always
outputs the same string value. Obviously, this isn't a very useful
program. What we really need is a servlet that allows us to interact
with it. We can easily interact with servlets by using parameters.
Servlets have two types of parameters: initialization parameters and
regular parameters. We'll consider regular parameters here and
explain initialization parameters later on in the tutorial.
If we wanted our example program to print "Hello <your
name>" instead of just "Hello World," we would accomplish this
task by using parameters. For simplicity, from now on the examples
will only implement the methods necessary to make the servlet work.
This will help keep the examples easier to read and the tutorial
small and easy to follow.
Listing 3 shows how we would retrieve a parameter's value using
the getParameter(String) method. If the parameter name we're
trying to retrieve isn't defined, the getParameter(String)
method will return a null value. As simple as it looks, this is
all that's required for getting the parameter's value.
Listing 3. Our program with parameter retrieval added
import java.io.*;
import javax.servlet.*;
import javax.servlet.http.*;

public class HelloWorld extends HttpServlet
{
   public void init(ServletConfig config) throws ServletException
   {
      super.init (config);
   }

   public void service(HttpServletRequest servReq, HttpServletResponse servRes) throws IOException
   {
      String userName;
      ServletOutputStream out = servRes.getOutputStream();

   if( (userName = servReq.getParameter("userName")) != null)
      out.println("Hello " + userName);

   else
      out.println("Hello, who are you?");
   }
}
Now that we know how to retrieve parameters, we need to learn how
to specify them. There are various ways to specify parameters. The
most basic way is via a GET query string, which enables us to specify
parameters in the following way:
http://host/servlet/HelloWorld?userName=Mary
Another method of specifying parameters is through Server Side
Include (SSI) and using the <servlet> tag, as in the
following example:
<servlet code="HelloWorld" >
<param name="userName" value="Mary">
</servlet>
The most common method of specifying parameters is in an HTML
form. For example, you could use the following form to send your name
and address to a servlet:
<form action="/old?u=http%3A%2F%2Fdeveloper.iplanet.com%2Fservlet%2FMyServlet&y=1999" method="get">
Name: <input name="name"><br>
Address: <input name="address"><br>
<input type=submit>
</form>
Initialization Parameters
Now that we know how to retrieve and specify regular parameters,
we can look at an example that requires initialization parameters.
For simplicity, we'll continue using the same example program, with
added features. Let's assume that we need a counter to keep track of
how many times a specific home page is accessed. Furthermore, we'd
like to be able to print the counter's value in a different font
size. To accomplish this task, as shown in Listing 4, we'll need two
extra variables - counter and fontSize.
Listing 4. Our program with initialization parameters added
import java.io.*;
import javax.servlet.*;
import javax.servlet.http.*;

public class HelloWorld extends HttpServlet
{
   //Default values
   private static final int FONTSIZE = 3;
   private static final int COUNTER = 0;

   //Default variables
   public static int fontSize;
   public static int counter;

   public void init(ServletConfig config) throws ServletException
   {
      super.init (config);

   if (getInitParameter("fontSize") != null){
      try{
         this.fontSize = Integer.parseInt(getInitParameter("fontSize"));
      }
      catch (NumberFormatException e){
         this.fontSize = this.FONTSIZE;
      }
   }

   else
      this.fontSize = this.FONTSIZE;

   if (getInitParameter("counter") != null){
      try{
         this.counter = Integer.parseInt(getInitParameter("counter"));
      } catch (NumberFormatException e){
         this.counter = this.counter;
      }
   }

   else
      this.counter = this.counter;
   }

   public void service(HttpServletRequest servReq, HttpServletResponse servRes) throws IOException
   {
   // Set the content type.
   servRes.setContentType("text/html");
      String userName;
      ServletOutputStream out = servRes.getOutputStream();

   if (servReq.getParameter("userName") != null)
      userName = servReq.getParameter("userName");

   else
      userName = new String("Stranger");
      out.println("<HTML><HEAD><TITLE>Hello World</TITLE></HEAD><BODY>");
      out.println(userName + "This page has been accessed <FONT size=+" + fontSize +">" + counter++ + "</font> times<BR>");
      out.println("</BODY></HTML>");
   }
}
Right away, we see that Listing 4 includes some methods we haven't
previously seen. I'll explain the program piece by piece. Assuming
you know the basics of Java, I won't explain the constants and
variables declarations. After the declarations, the first method we
encounter is the init(ServletConfig) method. This time,
however, we're using the init(ServletConfig) method to
retrieve the initialization parameters with the
getInitParameter(String) method, and to initialize the global
variables.
At this point in the program, let's review a couple of things.
First, we know that servlets remain in memory until the server is
restarted or until they're reloaded dynamically. Second, since
the init() method is called only once during the
initialization stage, the global variables are going to be
initialized only one time (when the servlet is first invoked). With
those two points in mind, we can see that once the global variables
are initialized they'll be available throughout the life cycle of the
servlet, keeping their state through different client requests.
So following the code in the init() method, we can see
that if the user declares valid initialization parameters, the global
variables will be set to those values. On the other hand, if the user
doesn't specify initialization parameters or specifies the wrong
ones, the global variables will be set to the default values (the
constants). This flexibility allows us to start counting at whatever
value we wish. It also allows us to specify the font size we want for
the value of the counter display. With a little imagination we can
see how useful this can be in almost any application.
Besides the changes in the init(ServletConfig) method,
the method service(HttpServletRequest, HttpServletResponse)
also introduces another method -
servRes.setContentType(String). If you remember, the purpose
of this program is to display the user name and the number of times
the page has been accessed. Furthermore, we want to display the
counter's value in a different font size, so we need to use HTML. As
you can see, we've embedded the HTML in the print statements. We need
to let the browser know that we're going to be displaying HTML.
The servRes.setContentType("text/html") method is provided
so we can set the content's MIME type. Once we set the MIME type, the
rest of the code is self-explanatory; we get the parameters and then
print to the browser.
Now that we know how to retrieve initialization parameters, we
also need to know how to set these parameters to the servlet. In
JRun, you set
initialization parameters with the JRun Admin tool. Consult
the JRun
documentation for details on how to do this.
CONCLUSION
Servlets are the future. Blurring the differences between
platforms, servlets help to realize Java's promise of "write once,
run anywhere." They also make server-side application development
fun. Now that you've installed the JRun Servlet Engine on your web
server and read through the above tutorial, you should be able to
start developing your own simple servlets. Give it a try - the
future awaits!
FURTHER RESOURCES
View Source wants your feedback!
Write to us and let us
know
what you think of this article.
Paul Colton is president
and CEO of Live Software Inc.
(Santa Clara, CA). Paul has had more than ten years' experience as a
software engineer and technical director and has been developing
applications in Java since its inception. Paul is the lead developer
of the JRun Servlet Engine product line as well as the JRun Scripting
Toolkit product, an advanced Java-based HTML scripting system. He has
authored several articles in computer science -- related trade journals
and was a contributing author to the first edition of the book
Java Unleashed, published by Sams.net.
(10.98)
- Related Reading:
Any sample code included above is provided for your use on an "AS IS" basis, under the Netscape License Agreement - Terms of Use


